简介:redux是专门用来做状态管理的Js库
第一章 redux理解
1.redux是什么
- redux是专门用来做状态管理的JS库
- 它可以在react/vue/Angular框架中使用
- 作用:集中式管理react应用中多个组件共享的状态
2.什么情况下需要使用redux
- 某个组件的状态需要共享给其他组件
- 一个组件需要改变另一个组件的状态(通信)
3.redux的安装
- yarn add redux
第二章 redux三个核心概念
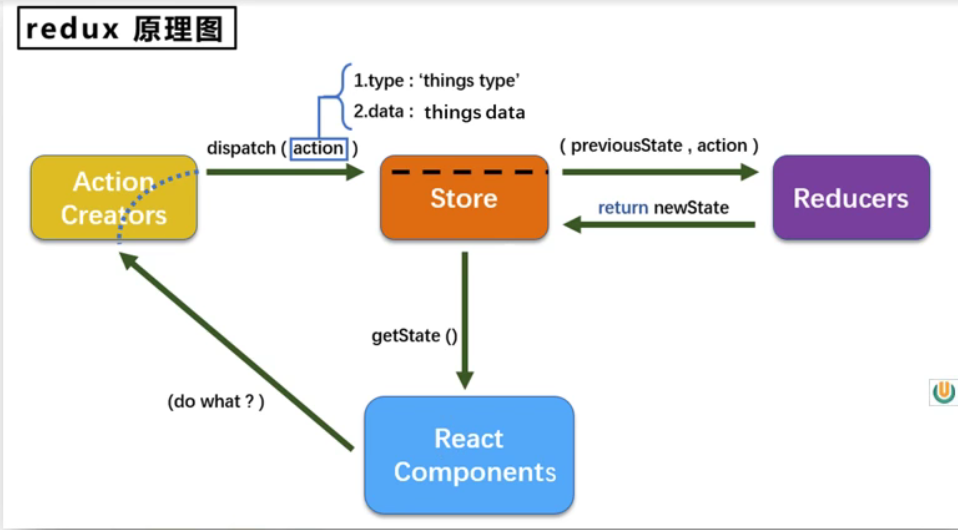
- action:就是要操作的状态对象
- type:要执行的动作
- data:执行动作需要操作的数据
- dispatch:分发,用于将action提交给其他地方,继续将action往下送给Store
- Store:action的存储地方,不进行任何的状态加工
- Reducer:用于加工action,与Store互动,并且可以初始状态
第三章 redux核心API
- store.getState:获取store的状态
- store.dispatch:将Action发送给store,Action也可以是一个里面有action对象的回调函数
- store.subscribe:用于订阅每次改变的状态,并捕获状态的更新
第四章 使用redux编写简易应用
1.原生react编写:
1 | import React, { Component } from 'react' |
2.简易redux编写
- 省略Action Creater
- redux的状态更改不会直接导致页面渲染,需要自己重新渲染
- redux的公共状态更新时,在组件中需要使用componentDidMount捕获,当然,最好的办法就是在index入口文件就进行捕获
- reducer是一个纯函数,只用于根据type执行相应的操作而已
store文件
1 | /** |
reducer文件
1 | /** |
Count组件文件
1 | import React, { Component } from 'react' |
index文件
1 | import React from 'react' |
3.完整redux编写
新增文件:
- action.js:专门用于创建action对象
1
2
3
4
5
6
7
8
9
10
11import store from './store'
export const actionIncreament = (value) => ({
type: 'increment',
data: value * 1
})
export const actionDecrement = (value) => ({
type: 'decrement',
data: value * 1
})- constant.js:专门用于管理type字符串,防止程序员的单词拼写错误
1
2
3
4
5
6/**
* 该模块是为了定义action变量中的常量值
*/
const INCREMENT = 'increment'
const DECREMENT = 'decrement'
第五章 redux异步编程
- store文件
1 | // 我们需要在store文件上面添加: |
- action文件
1 | // 异步action,就是指action的返回值是一个回调函数,因为函数能开启异步任务 |
- 组件Count的index文件
1 | incrementIfAsync = () => { |
按照这样的书写方式,为redux的action异步编程
善用store.dispatch(),该函数不仅可以接收对象,还可以接收回调函数
第六章 react-redux
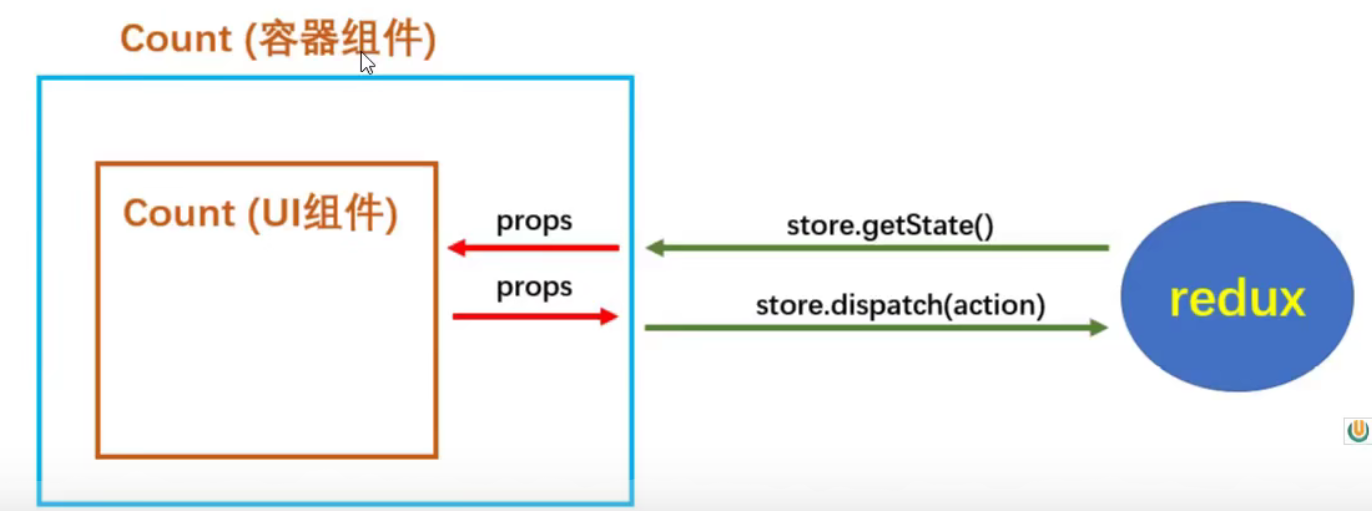
1.react-redux和UI组件的关系
- 所有的UI组件都应该包裹一个容器组件,他们是父子关系
- 容器组件时真正跟redux打交道的,里面可以随意使用redux的api
- UI组件中不能使用redux的api
- 容器组件会传给UI组件:
- redux保存的状态
- 用于操作状态的方法
- 传递状态和操作状态的方法,我们使用props
- react-redux有不想让UI组件直接操作状态的意思
2.一些规范
- UI组件都放在Component文件夹中
- 容器组件都放在Container文件夹中
3.模型图
4.连接实例
作为容器组件,与react-redux连接,那么容器组件需要大量使用react-redux的api
连接方法
App文件
1
2
3
4
5
6
7
8
9
10
11
12
13import React, { Component } from 'react'
import Count from './containers/Count'
import store from './redux/store'
export default class App extends Component {
render() {
return (
<div>
<Count store={store}/>
</div>
)
}
}容器文件
1
2
3
4
5
6
7
8
9
10
11// 引入UI组件
import CountUI from '../../Component/Count'
// // 引入redux的store
// import store from '../../redux/store'
// 引入react-redux中的connect方法
import {connect} from 'react-redux'
// 连接redux和UI组件
const CountContainer = connect()(CountUI)
export default CountContainer
5.数据互动
原理:
- 连接之后,connect(mapDispatchToProps, mapDispatchToProps)(UI),mapStateToProps与mapDispatchToProps都代表一个对象:
- mapStateToProps函数返回的对象作为key就作为传递给UI组件props的key,value就作为传递给UI组件props的value——状态
- mapDispatchToProps函数返回的对象作为key就作为传递给UI组件props的key,value就作为传递给UI组件props的value——操作状态的方法
- 因此,我们只要将需要渲染的数据先在mapStateToProps拿出来,再从组件的DOM操作中使用
1
2
3
4
5
6
7
8
9
10
11export default connect(
// mapStateToProps
state => ({
people:state.personReducer,
countNum:state.countReducer
}),
// mapDispatchToProps
{
add: actionAddPeople //用于添加人
}
)(Person)1
2
3
4
5
6
7
8
9
10
11
12
13
14
15
16
17
18
19
20
21
22
23
24
25
26class Count extends Component {
Syn = () => {
const {value} = this.selectNumber
this.props.addSyn(value)
}
Asyn = () => {
const {value} = this.selectNumber
this.props.addAsyn(value, 500)
}
render() {
return (
<div>
<h1>count:{this.props.count}</h1>
<h1>number of people:{this.props.peopleNum}</h1>
<select ref={c => this.selectNumber = c}>
<option value={1}>1</option>
<option value={2}>2</option>
<option value={3}>3</option>
</select>
<br />
<button onClick={this.Syn}>Syn+</button>
<button onClick={this.Asyn}>Asyn+</button>
</div>
)
}- 连接之后,connect(mapDispatchToProps, mapDispatchToProps)(UI),mapStateToProps与mapDispatchToProps都代表一个对象:
第七章 使用react-redux数据共享
1.注意事项
- 我们需要将其他组件对应的reducer合并
- 合并之后变成了一个对象,我们需要自行进行对象的取属性的 ‘’ . ‘’操作
2.原理与详细
原理:
- 连接之后,connect(mapDispatchToProps, mapDispatchToProps)(UI),mapStateToProps与mapDispatchToProps都代表一个对象:
- mapStateToProps函数返回的对象作为key就作为传递给UI组件props的key,value就作为传递给UI组件props的value——状态
- mapDispatchToProps函数返回的对象作为key就作为传递给UI组件props的key,value就作为传递给UI组件props的value——操作状态的方法
- 因此,我们只要将需要渲染的数据先在mapStateToProps拿出来,再从组件的DOM操作中使用
1
2
3
4
5
6
7
8
9
10
11export default connect(
// mapStateToProps
state => ({
people:state.personReducer,
countNum:state.countReducer
}),
// mapDispatchToProps
{
add: actionAddPeople //用于添加人
}
)(Person)1
2
3
4
5
6
7
8
9
10
11
12
13
14
15
16
17
18
19
20
21
22
23
24
25
26
27class Count extends Component {
Syn = () => {
const {value} = this.selectNumber
this.props.addSyn(value)
}
Asyn = () => {
const {value} = this.selectNumber
this.props.addAsyn(value, 500)
}
render() {
return (
<div>
<h1>count:{this.props.count}</h1>
<h1>number of people:{this.props.peopleNum}</h1>
<select ref={c => this.selectNumber = c}>
<option value={1}>1</option>
<option value={2}>2</option>
<option value={3}>3</option>
</select>
<br />
<button onClick={this.Syn}>Syn+</button>
<button onClick={this.Asyn}>Asyn+</button>
</div>
)
}
}- 连接之后,connect(mapDispatchToProps, mapDispatchToProps)(UI),mapStateToProps与mapDispatchToProps都代表一个对象:
store文件:将多个reducer同时合并起来
1 | import { createStore, applyMiddleware, combineReducers } from 'redux' |
- 入口文件:Provider的用处是重点
1 | import React from 'react' |
action文件夹
- count_action
1
2
3
4
5
6
7
8
9
10
11
12
13
14
15import store from '../store'
import {INCREMENT} from '../constant'
export const actionIncrement = (value) => ({
type: INCREMENT,
data: value * 1
})
export const actionAsynIncrement = (value, time) => {
return (dispatch) => {
setTimeout(()=>{
store.dispatch(actionIncrement(value))
}, time)
}
}- person_action
1
2
3
4
5
6import {ADDPEOPLE} from '../constant'
export const actionAddPeople = (people) => ({
type: ADDPEOPLE,
data: people
})reducer文件夹
- count_reducer
1
2
3
4
5
6
7
8
9
10
11
12
13
14import {INCREMENT, DECREMENT} from '../constant'
const initState = 100
export default function countReducer(preState = initState, action){
const {type, data} = action
switch(type){
case INCREMENT:
return preState + data
case DECREMENT:
return preState - data
default:
return preState
}
}- person_reducer
1
2
3
4
5
6
7
8
9
10
11
12
13
14import {ADDPEOPLE} from '../constant'
const initName = [
{id: 1, name: 'kd', age: 12}
]
export default function personReducer(preState = initName, action){
const {type, data} = action
switch(type){
case ADDPEOPLE:
return [data, ...preState]
default:
return preState
}
}组件文件夹:将容器组件和UI组件一起书写,所以放在一个文件夹里面了
- Count
1
2
3
4
5
6
7
8
9
10
11
12
13
14
15
16
17
18
19
20
21
22
23
24
25
26
27
28
29
30
31
32
33
34
35
36
37
38
39
40
41
42import React, { Component } from 'react'
import {connect} from 'react-redux'
import {actionIncrement, actionAsynIncrement} from '../../redux/actions/count_action'
class Count extends Component {
Syn = () => {
const {value} = this.selectNumber
this.props.addSyn(value)
}
Asyn = () => {
const {value} = this.selectNumber
this.props.addAsyn(value, 500)
}
render() {
return (
<div>
<h1>count:{this.props.count}</h1>
<h1>number of people:{this.props.peopleNum}</h1>
<select ref={c => this.selectNumber = c}>
<option value={1}>1</option>
<option value={2}>2</option>
<option value={3}>3</option>
</select>
<br />
<button onClick={this.Syn}>Syn+</button>
<button onClick={this.Asyn}>Asyn+</button>
</div>
)
}
}
export default connect(
state => ({
count: state.countReducer,
peopleNum: state.personReducer.length
}),
{
addSyn: actionIncrement,
addAsyn: actionAsynIncrement
}
)(Count)- Person
1
2
3
4
5
6
7
8
9
10
11
12
13
14
15
16
17
18
19
20
21
22
23
24
25
26
27
28
29
30
31
32
33
34
35
36
37
38
39
40
41
42import React, { Component } from 'react'
import {connect} from 'react-redux'
import {actionAddPeople} from '../../redux/actions/person_action'
import personReducer from '../../redux/reducers/person_reducer'
import {nanoid} from 'nanoid'
class Person extends Component {
addPerson = () => {
const name = this.nameNode.value
const age = this.ageNode.value
const Obj = { id:nanoid(), name, age }
this.props.add(Obj)
}
render() {
return (
<div>
<h1>the number of people:{this.props.number}</h1>
<h1>the number of count:{this.props.countNum}</h1>
<ul>
{
this.props.people.map((p)=>{
return <li key={p.id}>{p.name}-----{p.age}</li>
})
}
</ul>
<input ref={c=>this.nameNode = c} type="text" placeholder="输入名字"/>
<input ref={c=>this.ageNode = c} type="text" placeholder="输入年龄"/>
<button onClick={this.addPerson}>添加</button>
</div>
)
}
}
export default connect(
state => ({
people:state.personReducer,
countNum:state.countReducer
}),
{
add: actionAddPeople
}
)(Person)
第八章 纯函数
redux机制:发现preState和之后的状态一致的时候,就不会发生更新
- 在更新的时候会发生一次浅比较,如果两者地址相同,就不会进行更新
- 因此,对于数组操作:unshift(),push(),是不可以的
- 因此我们需要[…preState,data]来进行新数组包装操作
纯函数:
- 只要是同样的输入,必定得到同样的相同的输出
- 纯函数必须遵守以下内容:
- 不得改写参数数据
- 不会产生任何副作用,比如网络请求,和输入输出设备
- 不能调用Date.now()或者Math.random()等不纯的方法
- redux的reducer函数必须是一个纯函数
第九章 redux开发者工具
1 | import { createStore, applyMiddleware, combineReducers } from 'redux' |
这样就可以进行开发者工具的使用了
第十章 打包运行
输入指令:npm run build
输入之后,会产生一个build文件夹,这个文件夹都是存粹的html和js
接下来就是把文件部署到服务器上面
- 用node手写服务器
- 用serve服务(适用于自行查看效果)
- 全局安装:npm i serve -g
- 命令行输入:serve build:以build为入口打开